Stop Throwing Away Your Dirty Mop: This One Simple Ingredient Can Make It Look Brand New Again
Revive your dirty mop with one simple household ingredient. Learn a safe, effective method to clean, disinfect, and extend your mop’s life.
You finish mopping the floor… and then look down at the mop itself.
It’s grimy. It smells off. And suddenly, it feels like you just spread dirt instead of cleaning it.
Most people’s first instinct? Toss it and buy a new one.
But here’s the part many don’t realize: a dirty mop isn’t ruined—it’s just improperly cleaned.
With the right method—and one surprisingly powerful ingredient—you can restore your mop to a fresh, usable state in minutes. This isn’t a gimmick or a hack that only works once. It’s a practical, repeatable solution used in real homes across the U.S.
Let’s walk through exactly how it works, why it matters, and how to do it safely.
Why a Dirty Mop Is a Bigger Problem Than You Think
A neglected mop isn’t just unpleasant—it can actually make your home less hygienic.
Here’s what happens when you reuse a dirty mop:
- Bacteria and odors build up over time
- Floors get streaky or sticky
- You redistribute grime instead of removing it
- Your home may develop a lingering “musty” smell
According to cleaning experts, mops should be cleaned thoroughly after every few uses, especially in high-traffic homes.
The “Magic” Ingredient: White Vinegar
The simple ingredient that makes the biggest difference?
White vinegar.
It’s inexpensive, widely available in the U.S., and incredibly effective for cleaning.
Why Vinegar Works So Well
White vinegar contains acetic acid, which helps:
- Break down grime and residue
- Neutralize odors
- Kill many types of bacteria
- Dissolve mineral buildup
It’s especially useful for mop heads made of cotton, microfiber, or sponge materials.
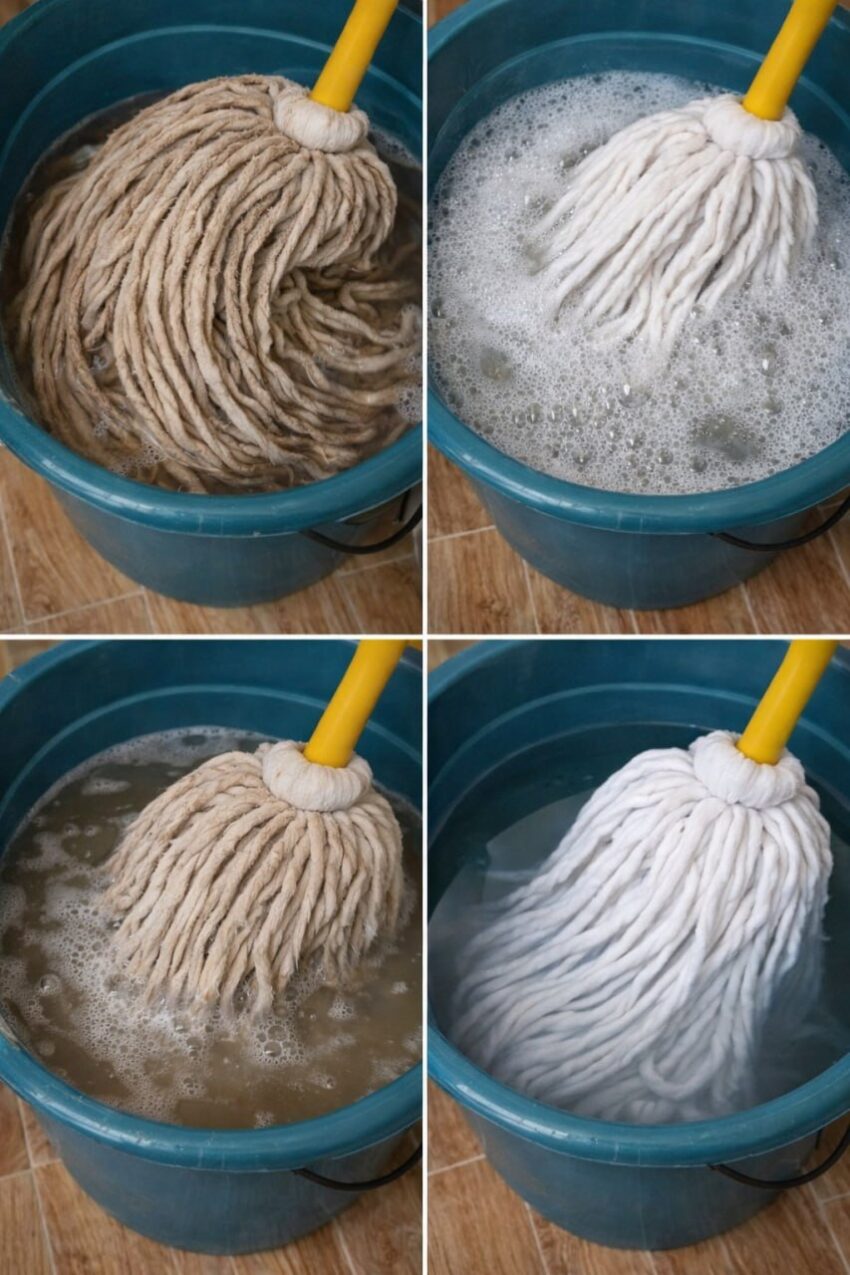
Step-by-Step: How to Deep Clean Your Mop
This method works for most common household mops.
What You’ll Need
- White vinegar
- Hot water
- A bucket or sink
- Optional: baking soda (for extra odor removal)
Step 1: Rinse the Mop First
Before soaking, rinse the mop under hot water.
This removes:
- Loose dirt
- Dust
- Debris
Step 2: Prepare the Cleaning Solution
Mix:
- 1 part white vinegar
- 2 parts hot water
For stronger odors, add:
- 1 tablespoon baking soda
Step 3: Soak the Mop
Place the mop head in the solution.
Let it soak for:
- 20–30 minutes
For heavily soiled mops, extend up to 1 hour.
Step 4: Agitate and Scrub
After soaking:
- Swish the mop in the solution
- Gently scrub with your hands (wear gloves if needed)
You’ll often see the water turn cloudy—that’s a good sign.
Step 5: Rinse Thoroughly
Rinse under clean, warm water until:
- No residue remains
- Water runs clear
Step 6: Dry Properly
This step is crucial.
- Hang the mop head to air dry
- Avoid leaving it in a bucket
Proper drying prevents bacteria from returning.
Real-Life Scenario
A homeowner notices their kitchen floor still smells “off” even after mopping.
They replace cleaning solutions repeatedly—but nothing changes.
The real issue? The mop itself.
After using a vinegar soak, the odor disappears—and cleaning results improve instantly.
This is more common than most people think.
When Vinegar Alone Isn’t Enough
In some cases, you may need extra help.
Use Baking Soda for Heavy Odors
- Neutralizes strong smells
- Works well with vinegar
Use Mild Detergent for Greasy Residue
Especially useful in:
- Kitchens
- Garages
What Types of Mops Can You Clean This Way?
Safe for:
- Cotton string mops
- Microfiber mops
- Sponge mops
Use caution with:
- Steam mop pads (check manufacturer instructions)
Pros and Cons of Using Vinegar
Pros
- Affordable
- Non-toxic
- Easy to use
- Effective odor remover
Cons
- Strong smell (temporary)
- Not suitable for all surfaces (like natural stone floors)
Common Mistakes to Avoid
- Skipping the rinse step
- Not drying the mop properly
- Using too little vinegar
- Letting the mop sit wet after cleaning
- Assuming the mop is “clean enough”
Expert Tips Most People Don’t Know
- Clean your mop after every 2–3 uses
- Replace mop heads every 2–3 months depending on use
- Use hot water, not cold, for better results
- Store mops in a dry, ventilated area
2026 Cleaning Trends in U.S. Homes
- Increased use of eco-friendly cleaning solutions
- Shift toward reusable cleaning tools
- Growing awareness of hygiene beyond visible dirt
Vinegar-based cleaning fits perfectly into these trends.
FAQs (People Also Ask)
1. Can vinegar disinfect a mop?
It helps reduce bacteria, though it’s not a hospital-grade disinfectant.
2. How often should I clean my mop?
Every few uses—or immediately after heavy cleaning.
3. Can I mix vinegar and bleach?
No. This creates harmful fumes.
4. Why does my mop still smell after cleaning?
It may not have dried properly.
5. Can I machine wash mop heads?
Yes, if the manufacturer allows it.
6. Is vinegar safe for microfiber?
Yes, in moderate amounts.
7. How long should I soak the mop?
20–30 minutes is usually enough.
8. Can I use apple cider vinegar instead?
White vinegar is more effective and affordable.
9. When should I replace my mop?
When it shows wear or stops cleaning effectively.
10. Does hot water matter?
Yes, it improves cleaning power.
Action Checklist
- ✔ Rinse mop after each use
- ✔ Deep clean with vinegar weekly
- ✔ Dry thoroughly after cleaning
- ✔ Replace worn-out mop heads
- ✔ Store in a dry space
A dirty mop doesn’t mean it’s time for the trash—it usually means it needs proper care.
With something as simple as white vinegar, you can restore cleanliness, eliminate odors, and extend the life of your cleaning tools without spending extra money.
It’s one of those small habits that quietly makes your entire home feel fresher.
Don’t replace your mop—refresh it. A simple vinegar soak can turn a dirty, smelly mop into a clean, effective tool again.
If you found this helpful, share it with someone who loves a clean home—or drop a comment with your go-to cleaning tricks.