Homemade Bread in the Air Fryer: Soft, Fluffy, and So Good You’ll Want to Make It Again and Again 😋😍
Learn how to make soft, fluffy homemade bread in the air fryer. Easy step-by-step recipe with simple ingredients and perfect bakery-style results.
There’s a special kind of satisfaction that comes from baking your own bread.
That moment when the dough rises.
When the kitchen fills with a warm, comforting aroma.
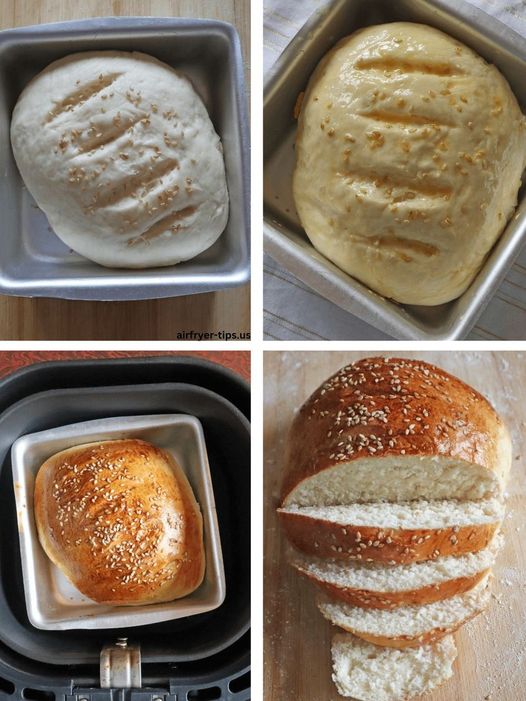
When you finally tear into a loaf and feel that soft, fluffy texture still slightly warm inside.
It feels like something you’d only get from a bakery.
But this time… it came from an air fryer.
The first time I tried making bread in the air fryer, I wasn’t sure what to expect. I honestly thought it might turn out dense or uneven. But the result surprised me—so much that I had to try it again.
And the second attempt? Even better.
Golden crust on the outside.
Soft, airy inside.
And that fresh-baked smell that makes you pause mid-bite.
Now it’s one of those recipes I keep coming back to.
Why You’ll Love This Recipe
- Soft, fluffy texture every time
- No oven required
- Simple pantry ingredients
- Beginner-friendly baking method
- Faster than traditional bread baking
- Perfect for sandwiches, toast, or snacks
- Fresh homemade taste with minimal effort
Ingredients (With Exact Measurements)
For the Dough:
- 2 1/4 cups all-purpose flour (280g / 9.9 oz)
- 1 teaspoon salt (5g)
- 1 tablespoon sugar (12g / 0.4 oz)
- 1 packet instant yeast (2 1/4 tsp / 7g)
- 3/4 cup warm milk (180 ml / 6 oz)
- 2 tablespoons melted butter or oil (30 ml / 1 oz)
Optional:
- 1 egg (for richer texture)
- Sesame seeds or herbs for topping
- Garlic butter for brushing
Nutritional Information (Per Slice)
(Approx. based on 8 slices)
- Calories: ~150 kcal
- Protein: 4g
- Carbohydrates: 25g
- Fats: 4g
- Fiber: 1g
Dietary Notes:
- Vegetarian
- Can be made dairy-free (use plant milk + oil)
Kitchen Tools Needed
- Air fryer
- Mixing bowl
- Wooden spoon or spatula
- Small loaf pan or silicone mold
- Kitchen towel
Step-by-Step Preparation (Detailed)
Step 1: Activate the Yeast
In a bowl, mix:
- Warm milk
- Sugar
- Yeast
Let it sit for 5–10 minutes until foamy.
Pro Tip:
If it doesn’t foam, your yeast may be inactive.
Step 2: Make the Dough
Add to the yeast mixture:
- Flour
- Salt
- Melted butter or oil
Mix until a dough forms.
Step 3: Knead the Dough
Knead for 8–10 minutes until smooth and elastic.
Texture cue:
The dough should feel soft, slightly tacky, but not sticky.
Step 4: First Rise
Cover the dough and let it rest for 45–60 minutes, or until doubled in size.
Step 5: Shape the Dough
Punch down the dough gently and shape it into a loaf.
Place it into a greased loaf pan or silicone mold.
Step 6: Second Rise
Let it rest again for 20–30 minutes.
This helps create a lighter, fluffier bread.
Step 7: Air Fry
Preheat air fryer to 320°F (160°C).
Bake for 18–25 minutes, depending on size.
Texture cue:
- Golden brown top
- Hollow sound when tapped
Step 8: Cool Before Slicing
Let the bread cool for at least 15 minutes before slicing.
This helps set the texture inside.
Expert Tips & Mistakes to Avoid
1. Don’t Use Too Hot Milk
It can kill the yeast—lukewarm is perfect.
2. Don’t Skip Rising Time
This is what creates fluffy bread.
3. Avoid Overfilling the Pan
Dough expands while baking.
4. Check Early
Air fryers vary—start checking at 18 minutes.
Variations & Customizations
🧄 Garlic Herb Bread
Add garlic powder and dried herbs to the dough.
🧀 Cheesy Version
Mix shredded cheese into the dough or on top.
🍯 Sweet Bread
Add extra sugar and a touch of vanilla.
🌾 Whole Wheat Version
Replace half the flour with whole wheat flour.
Storage & Reheating Instructions
Room Temperature:
- Store for 2–3 days in airtight container
Fridge:
- Up to 5 days
Freezer:
- Up to 2 months
Reheating:
- Air fryer: 2–3 minutes at 300°F
- Toaster: light crisping
- Microwave: 10–15 seconds (soft texture)
Serving Suggestions
This homemade air fryer bread pairs perfectly with:
- Butter and jam
- Soups and stews
- Sandwich fillings
- Eggs for breakfast
- Garlic butter or dips
FAQs
1. Can I make bread without an oven?
Yes—air fryer works beautifully for small loaves.
2. Why is my bread dense?
Usually due to under-proofing or inactive yeast.
3. Can I use whole wheat flour?
Yes, but expect a slightly denser texture.
4. Do I need a loaf pan?
It helps shape the bread, but isn’t mandatory.
5. Can I double the recipe?
Yes, but bake in batches for best airflow.
There’s something incredibly rewarding about pulling fresh bread out of your own kitchen—especially when it turns out soft, fluffy, and bakery-worthy.
This air fryer version makes it easier than ever to enjoy that experience at home.
Try it once, and don’t be surprised if it becomes a weekly ritual.
And when you slice into that warm loaf for the first time… you’ll understand exactly why I made it twice already 😍